Like many people visiting Sri Lanka, we stopped for a few days in Ella. And as many who get there, we decided to take the hike to the summit of Ella’s Rock. And as many before us, we had a hard time finding informations on how to get there precisely.
Everybody will tell you that all you have to do is follow the railway, turn left at some (vague) point, and then climb. Truth is, there are many paths and very few indications. But there are loads of local guys waiting for you to get unsure about where you’re going. They will offer their assistance, promise that they just want to help you, tell you that they are not guides… and ask for a ridiculous amount of money once they walked with you up there.
We really wanted to do it on our own. So we combed the worldwide web, and found a few useful info (the Nomadic Boys helped us a lot taking the right turn from the railway, Girl Tweets World explains how to get on the railway and relates a good experience with a guide…). But no complete explanation from start to finish anywhere (or maybe on a german or chinese blog, but I only read french and english…).
We did get lost on the way up. Several times. But we followed a very straight forward and easy way back down, that I decided to document. So I turned around at every intersection or landmark or place that could seem tricky, and took a pic. The photos hence look like what you should see on your way up. It is a lot of information, too much to memorise, really. But being a very visual person, I know that having seen pictures of specific parts of the track I would recognise them when I come across them, and know that I’m on the right path. On the other end, I suck at distances, big time. So there will be no “walk 152m, and then take the path that turns 43° left”. Just because I really don’t know about that…
Let’s get started.
We were staying at a guesthouse just out of Ella, and they have a direct path to the railway. For those who want to start from Ella’s town center, the people in town will be happy to show you how to get on the tracks. It is true for any place you’re staying at, really : everybody uses the railway as a walkway, and no matter where you start from, there should be a shortcut to get on the tracks easily, without going back to town.
For those who might be interested : we were staying at the Paddy Fields View Inn, the stairs are just out of the guesthouse (ask the family to show you if needed). There were two or three other guesthouses in the same area, that could use the same start.

No matter where you start, the railway tracks amount for a good part of the hike. Very scenic, easy, you will probably meet a lot of people using the tracks as the straightest way to school/work/town… We did not see any train, but keep an alert ear (the train goes very slowly, you would have plenty of time to get on the side if one was to pass…).
What you’re looking for is the tiny Kithalella train station.

As long as you haven’t passed it, keep going. After the train station, the next landmark is a big wooden bench, on the left of the tracks.

Keep going, still on the tracks. The next turn left is the good one. It doesn’t look like much. There are some rocks before it, and a track turns left behind them. That’s the one you want to take ! It looks like this :


It will make you come back a little bit on your steps, it’s all right. It goes slightly down, and you now have a river on your right. Very shortly, you will arrive to a bridge.
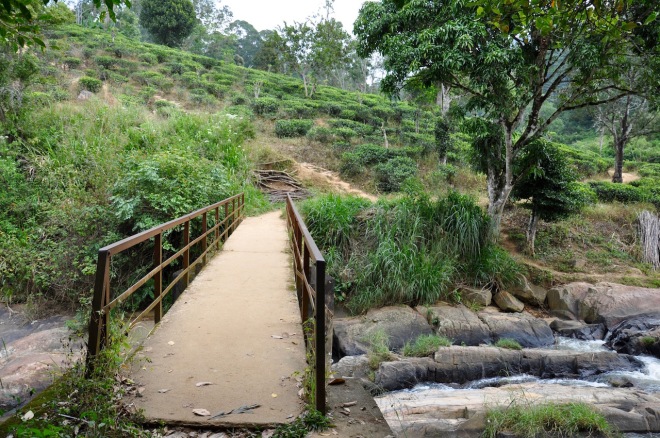

Cross it. And now, the big secret is to be revealed : DO NOT follow the very inviting path that goes on the right. Nonono. We did, it took us for ever to find our way again. The EASY way is the rocky dirt track that goes up into the tea plantations.

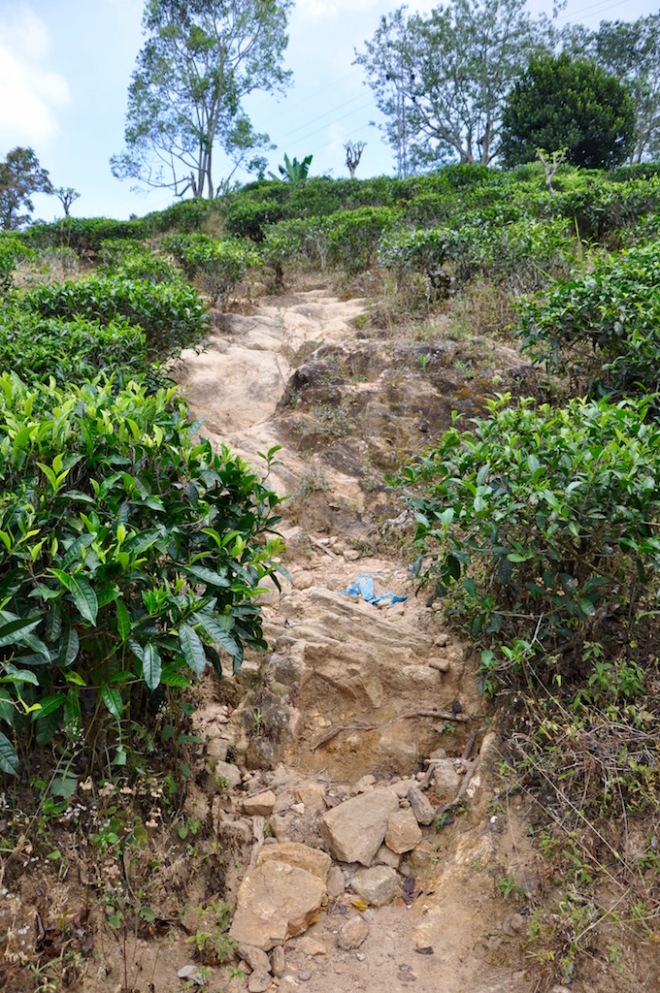
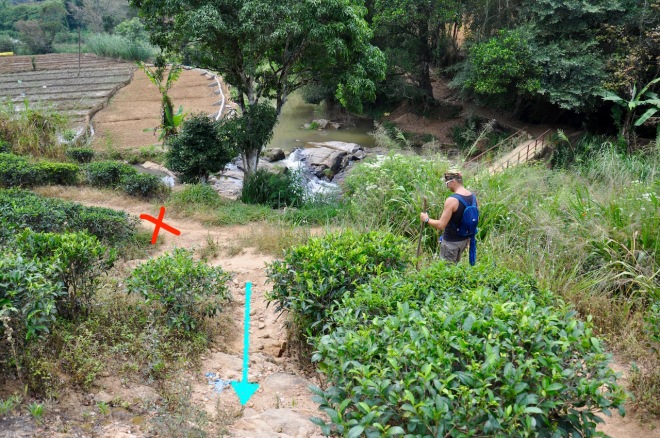
I put several pictures so that we agree on the one I talk about… It is rocky and bad for a few minutes, and then, is just turns left (picture below) into an easy dirt track, very simple to follow.

You have just passed the trickiest part, the one place where, if you go wrong, you’re in for a good forty minutes of finding a path again, through forest, high grass and so on… (leeches’ paradise, yuk…). Whereas if you get it right, it’s pretty much straight all the way up. As a rule of thumb : any V shaped intersection : take left ; any cross intersection, keep going straight in front of you, no left or right. You will pass a few houses on the way, it’s normal. Don’t let the guys tell you that it is the wrong way, you’re going into a village or whatever…


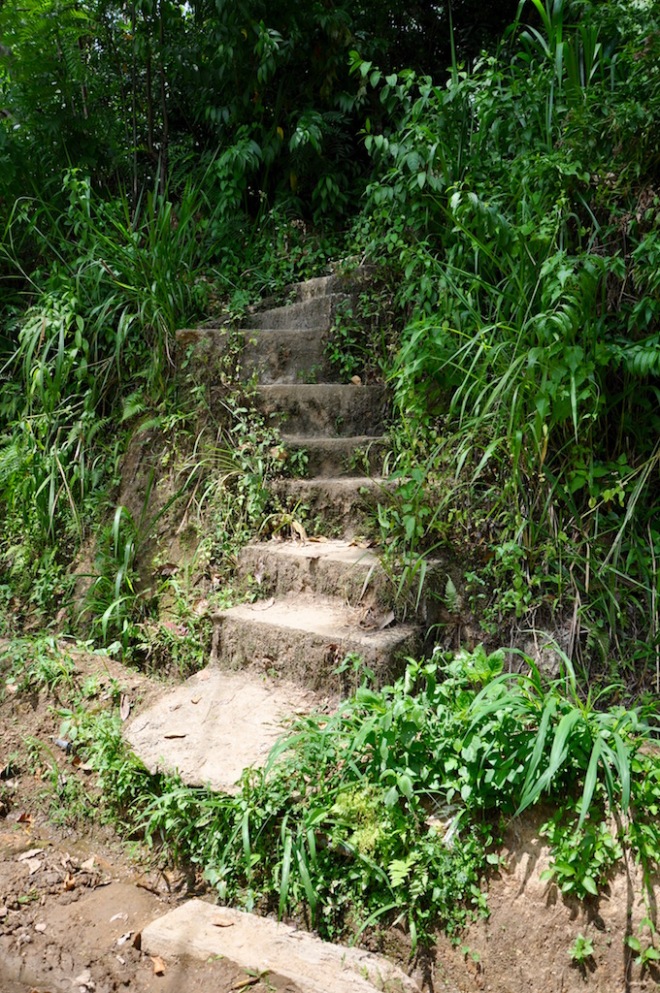
When you enter the forest, you will come across a tree, where, if you look close, somebody engraved an arrow. Turn left (as the arrow indicates.)

From that point, the path is quite clearly marked. Don’t get out of it, and there is really no reason to get lost. Stick to what was said above : when in doubt, take the left path. This being said, we felt that in this part of the hike, pretty much any track would probably take you to the summit.


By the time you finish crossing the burnt forest (if you read this in 2020, maybe it will have recovered, sorry about that…), your thigh muscles should be warm. They’d better be. You’re in for a good cardio : the last part of the hike is not very long in distance but, man, it is STEEP ! I think it is not even a third of the total distance, but a took us a good while to climb. You may want to find yourself a good walking stick before you get to that part, it helps.


One last turn left, back on the flat…

You’re two minutes away from destination.
I will not post pictures of the view, ’cause I think it is really rewarding to discover it when you get there. It is beautiful, and completely worth the good sweat. There is an old man up there, selling water, fresh coconuts and tea. Overpriced of course, but hey ! he juste did the same treck as you, carrying a bunch of coconuts and a pack of 1.5l water bottles…
Last pieces of advice : I was happy I had good shoes, especially own the way down. Take plenty of water. Plenty. And sunscreen, because except if you leave at 5am the railway tracks will be exposed when you come back, with no shade at all.
Enjoy !
NOTE : About all this fake guide business : I have nothing against people trying to make a living. But I do not like to be asked for (an insane amount of) money for unsolicited help. I am more than happy to pay the price for a service, but I hate to have anything forced upon me.
Taking a guide is a good idea if you are not sure about you orientation skills, and maybe there are some shorter / more scenic / easier paths. Just make sure you agree on a price before starting. That is the best and easiest path to a happy day !
